In a couple of days, you could build your own Star Wars inspired light saber. All you need is a few items from a home improvement or hardware store.

Wednesday, December 24, 2014
Build a Star Wars Jedi Light Saber
Jedi Light Saber
In a couple of days, you could build your own Star Wars inspired light saber. All you need is a few items from a home improvement or hardware store.
In a couple of days, you could build your own Star Wars inspired light saber. All you need is a few items from a home improvement or hardware store.
Monday, November 3, 2014
Foam Proton Pack
I needed a lightweight pack built quickly. My solution was insulation foam. It's easy to cut and sand.
I did one foam pack at 50% scale for my son, and a true scale pack for my wife.
I did one foam pack at 50% scale for my son, and a true scale pack for my wife.
 |
| The mini-pack. |
Friday, October 31, 2014
Halloween 2014: Ghostbuster
It's never too early to start planning for Halloween. I started writing this blog post in July.
Forever trying to top the previous years costume, I finally decided on a Ghostbuster. We're coming up on the 30th year anniversary, and who doesn't want a proton pack? Follow me as I walk you through my build.


Forever trying to top the previous years costume, I finally decided on a Ghostbuster. We're coming up on the 30th year anniversary, and who doesn't want a proton pack? Follow me as I walk you through my build.
Wednesday, October 29, 2014
No Job is Too Big - A Proton Pack Build
No Ghostbusters costume would be complete without a proton pack build.
I have a month to build the pack, finish the rest of my costume, and finish my son's costume.
I'm cutting it a bit short and will have to shortcut some details (which I will fix after Halloween).
I have a month to build the pack, finish the rest of my costume, and finish my son's costume.
I'm cutting it a bit short and will have to shortcut some details (which I will fix after Halloween).
 |
| The pack on Halloween. |
 |
| The wand on Halloween. |
Monday, October 27, 2014
We've GOT ONE! - A Ghost Trap Build
Many children of the '80s (and most adults) longed for a ghost trap and a proton pack. Since I never got either, combined with my son who loves Ghostbusters, I'm building us both traps.
 |
| Top of the line in paranormal containment. |
Wednesday, September 17, 2014
Parody Video - Another GPS Commercial
As a follow up to the previous post, here is another GPS parody commercial. Why make one video when you can make two at twice the time. Get your new GPS today!
Monday, September 15, 2014
Parody Video - GPS Commercial
If you've ever used a GPS, you've been annoyed with a GPS device. This video captures the frustration encountered, humorously.
Wednesday, September 10, 2014
Video Editing: Split Screen Initiative
I'm finally getting back to making videos. The production schedule is aggressive, so be on the lookout for videos. Today, I'm going to cover split screen compositing.
I used one actor for three different roles. While more time should have been spent on pre-production and planning, the concepts are helpful regardless. The split screen idea was developed on the fly, use my advice to perfect your process.
I used one actor for three different roles. While more time should have been spent on pre-production and planning, the concepts are helpful regardless. The split screen idea was developed on the fly, use my advice to perfect your process.
 |
| One actor, three parts. The power of split screen. |
Wednesday, September 3, 2014
Poster Design: Brewfest
This contest was to design a poster for the Bright Leaf Brew Fest. I entered last year winning first and third place. Here are my entries from last year.
My first idea was a heads up view of a bar. I wanted something futuristic looking. I ended up doing a '80s style pub and a more traditional pub. When I started drawing the pub it started out looking more traditional. I liked both, so I finished and entered both.
My first idea was a heads up view of a bar. I wanted something futuristic looking. I ended up doing a '80s style pub and a more traditional pub. When I started drawing the pub it started out looking more traditional. I liked both, so I finished and entered both.
 |
| Futuristic pub. |
Monday, September 1, 2014
Design Contest - Hardware
Every year Mockett holds a design competition for hardware and architectural components.
This year was the first year I managed to actually submit. Below are the components I submitted for entry. Winners should be announced in December.
The first design is a metal shelf bracket with a cotter pin that allows for differing shelf depths.

This year was the first year I managed to actually submit. Below are the components I submitted for entry. Winners should be announced in December.
The first design is a metal shelf bracket with a cotter pin that allows for differing shelf depths.
Wednesday, August 27, 2014
Sharing Google Docs Tutorial
I will cover how to collaborate within a Google spreadsheet. We will cover how to grant permissions, what permissions to grant, and how to make comments.
Monday, August 25, 2014
Keys for Logo Design
My favorite project, designing logos. I'll walk you through a few iterations and principles for logo design. One of the first to keep in mind, is a logo is going to end up on various pieces of media. A logo needs to be distilled to something that can be stitched on a shirt.

Monday, August 18, 2014

Wednesday, August 13, 2014
Scratch Built Router Table
I posted a preview of the router table back in November. Now, I'm finally going to walk you through building it. A trip to your local home improvement story will net you everything you need, provided you possess a router.
 |
| The finished router table. |
Monday, August 11, 2014
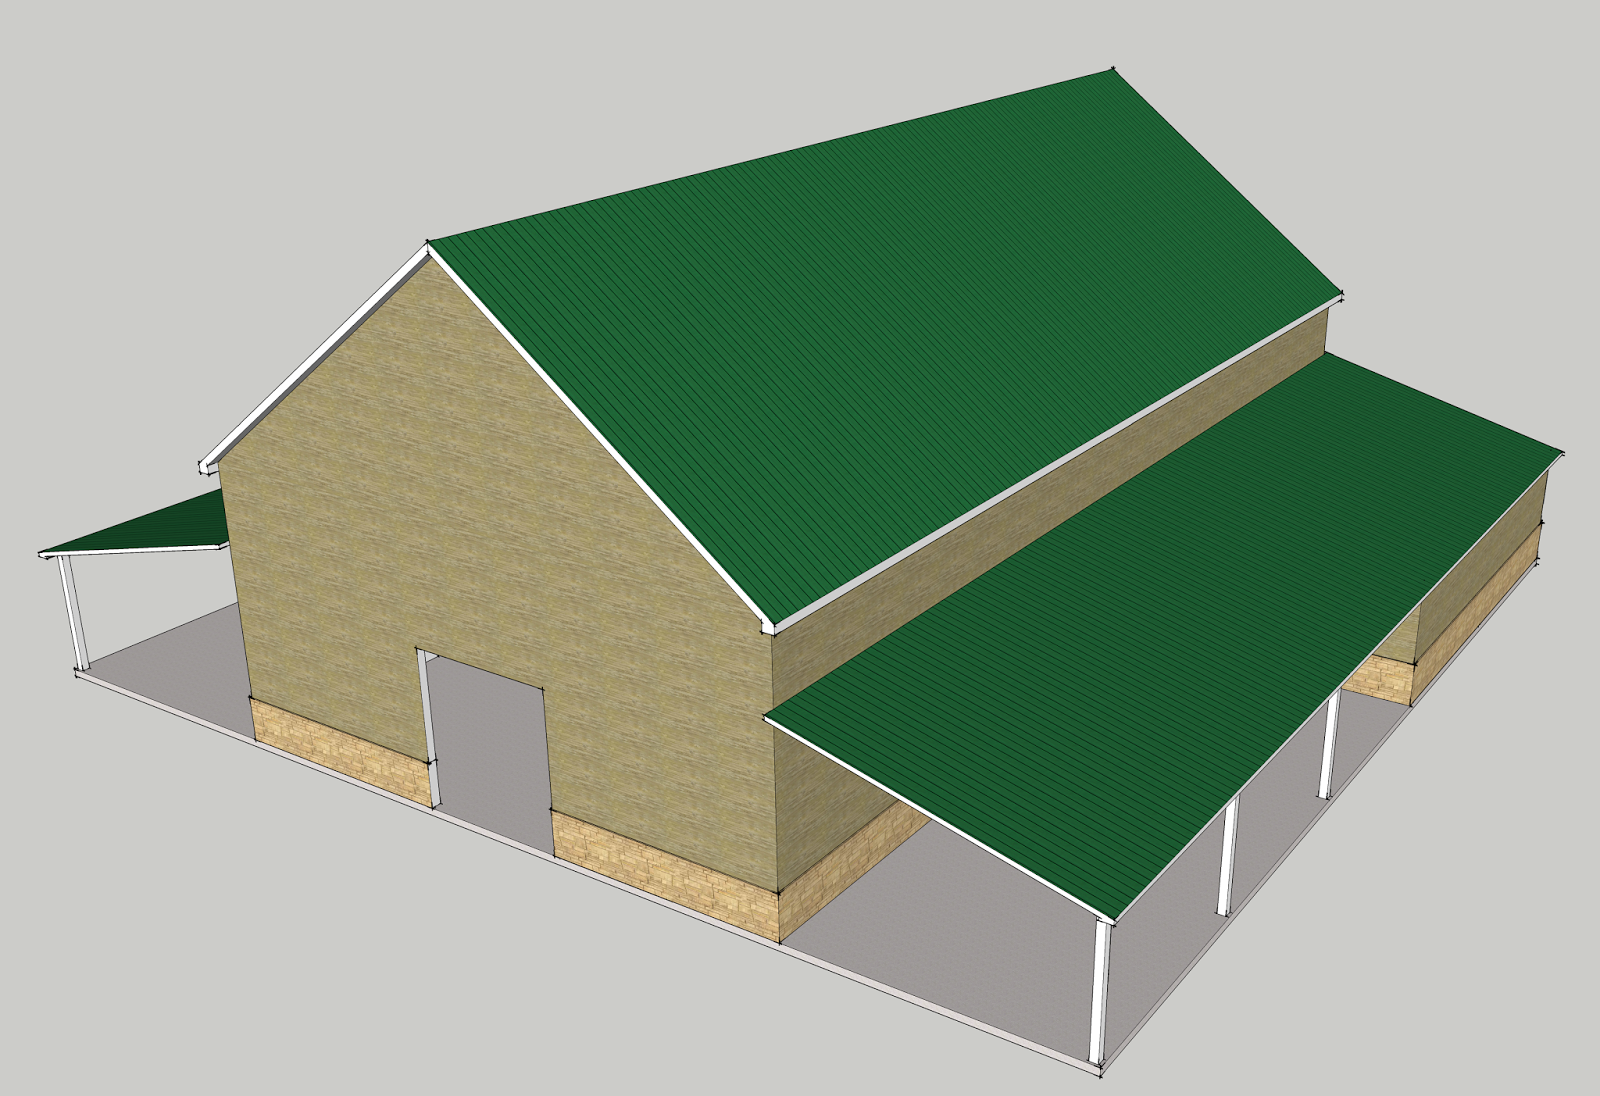
Barn Burning Sketchup Tutorial Part 2
In part 2 of the tutorial we will work on the exterior details. You can check out the previous tutorials here.
In part 1 we learned how to use many of the common tools, while illustrating the benefits of components & layers.
In part 1 we learned how to use many of the common tools, while illustrating the benefits of components & layers.
 |
| The barn with added exterior details. |
Monday, August 4, 2014
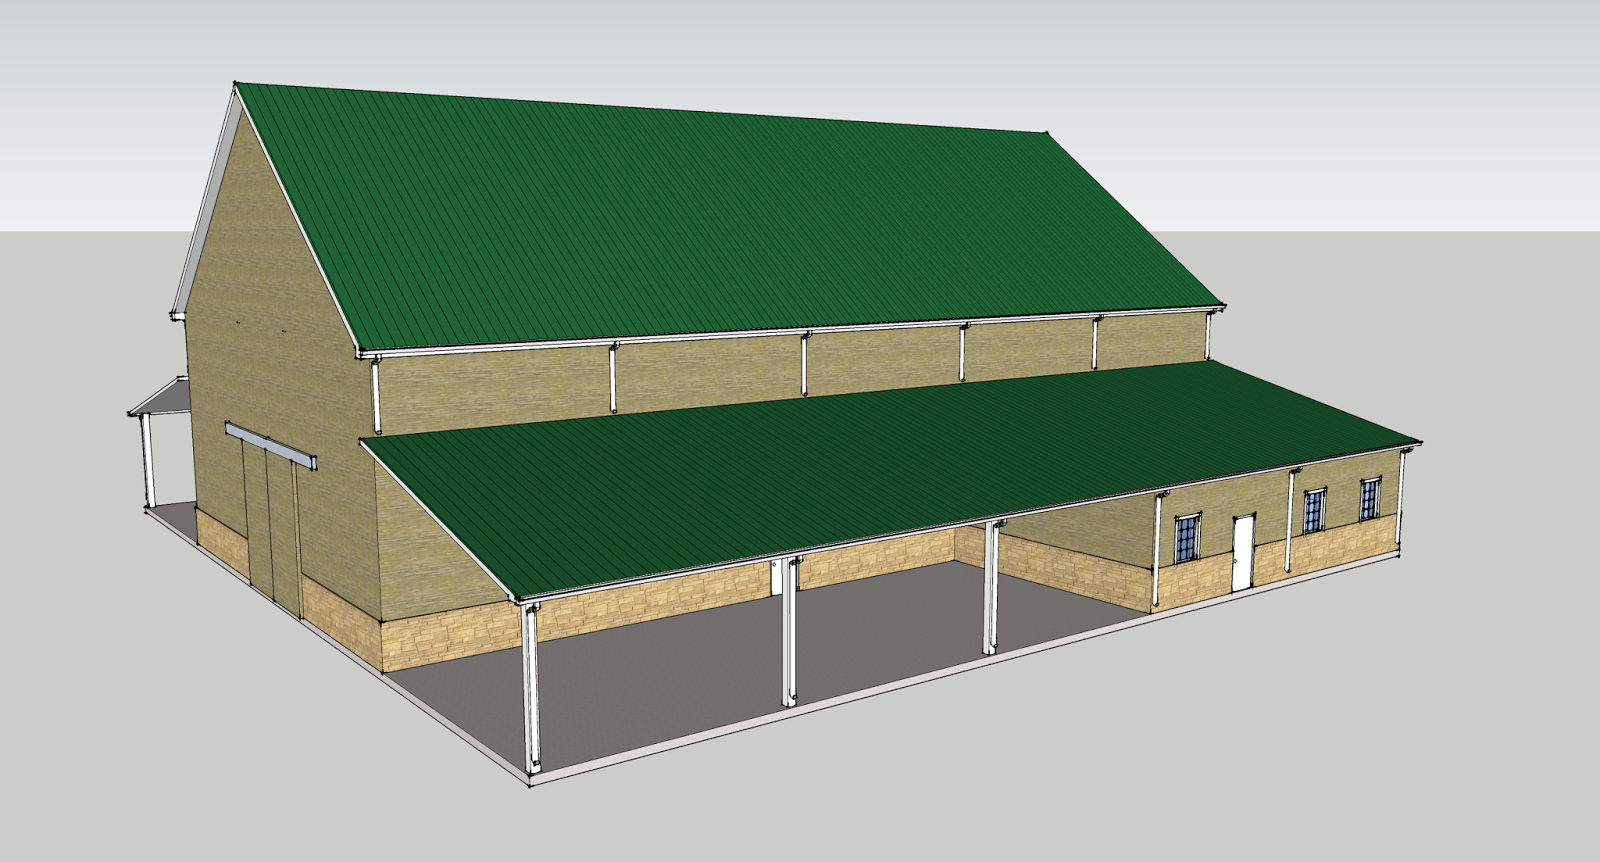
Barn Burning Sketchup Tutorial Part 1
In this series, we are going to draw a barn. I will cover how to use many of the common tools, illustrate the benefits of components & layers, and provide a real-world application.
 |
| The finished product at the end of this tutorial. |
Wednesday, July 30, 2014
Like, Totally '80s Text Tutorial
.png "80s text tutorial")
Monday, July 28, 2014

Wednesday, July 23, 2014
UFO Sighting
I've always found the idea of drawing a cartoon in photoshop a bit daunting. I've done a couple of quick sketches and wasn't happy with the results. I decided to try again. I was happy with this result. I'll walk you through what I did and why.
 |
| Just your typical UFO beaming up a hapless individual. |
Monday, July 21, 2014
Removing Wall Anchors
After deciding to relocate a set of floating shelves, I was left with plastic wall anchors in the drywall.

Wednesday, July 16, 2014
Zombie Text!!
 |
| The finished image. |
The style looks like something you'd see on a zombie movie poster. Here is how you can make your own title.
Monday, July 14, 2014
Improve Your Blog Layout Right Now
I'm going to give you some helpful tips for blogging that I've implemented on my own page recently. They don't include be yourself and write what you know. These are nuts and bolts tips concerning overall layout and formatting. I use blogger, so some of the specific instructions are geared towards that, but the tips are general.
Custom Social Network Links:


Custom Social Network Links:
Monday, July 7, 2014
Create a Custom Steel Button Graphic
If you need a custom icon, it's time to start reading.
 I created a set of steel icons for this blog. Check out how it's done.
Monday, June 30, 2014
Green Screen - Setting Your Photos Anywhere
A green screen can be had for very little. It's best if your setup has very few wrinkles, you can obtain a backdrop support system that will help. I didn't have a support system, so I ironed the green screen before clamping it to two doors I pulled off the hinges.
Below are a few pictures from the green screen. An unwrinkled green screen makes it easier to remove the background and insert a new background. You can remove any background but it will take longer. I used a layer mask and removed the background using the wand and eraser tools.
Pick your new background images and insert them below the character layer.
Adding shadows and shading can help tie the pictures together This layer would be below your character layer and above your background layer. I used the burn tool to darken edges and shadows of the characters. The brightness/contrast was adjusted as well.
Friday, June 27, 2014
Removing White Noise from an Audio Track
Audacity is a free audio editor. Among the various features, we are going to focus on noise removal.
This tool will be helpful if you are recording dialog and want to remove white noise. You need to be sure to record a few seconds of ambient noise so that you have a good sample. This works best if you are removing a constant hum.
Open your audio file, then using your mouse to click and drag, select a portion of white noise, that is devoid of any dialog or sound you want to keep.
 |
| The white noise sample is selected. |
Wednesday, June 25, 2014
Video Editing Introduction
Lightworks is a great video editing program. It can be intimidating upon first starting the program.
Check out my other topics related to video editing.
Lightworks is versatile, yet quickly becomes complicated with multiple video and audio tracks.
I'm going to run through a few simple commands that are the basis of Lightworks.
Check out my other topics related to video editing.
Lightworks is versatile, yet quickly becomes complicated with multiple video and audio tracks.
 |
| Lightworks edit with five video tracks and four audio tracks. |
Monday, June 23, 2014
Importing Into Lightworks Via Handbrake
This is a quick work flow of how I transcode my video to prepare it for Lightworks. See my introduction post on Lightworks coming on Wednesday.
If your camera or phone outputs interlaced video, you will want to run it through Handbrake to de-interlace the video and optimize it for Lightworks. This also includes options to set the frame rate.
Interlacing is done to double the perceived frame rate by imposing two fields of the video onto the same frame. The issue with interlaced frames is that quick movements can look blurred or fuzzy. De-itnerlacing solves the issue.
Once Handbrake is running, click the Source button and select the video file you need to prepare for Lightworks.
 |
| Click the source button to locate your video file. |
Wednesday, June 18, 2014
Movie Poster Text

Monday, June 16, 2014
Sketchup: Solar Study
Sketchup can be a great tool to develop a solar study. Below are three videos I created, two detailed animations and a rudimentary animation to delineate shadows.
Wednesday, June 11, 2014
An Introduction to the Business of Video
Creating a film as a personal project is an enriching experience. Creating a film for someone else where you are getting paid, is quite another.
I was asked to film a wedding, which is amazing due to the fact that my resume contains only horror and comedy shorts. I will talk through the points I considered during this project for hire, and things to remember if you want to make a run at turning your hobby into a business.
Since you are here for visual entertainment, here is the streaming video package that was part of the contract. Keep reading if you want a little bit of insight into the process.
Monday, June 9, 2014
It's the Map, It's the Map, It's the Treasure Map
Who doesn't want an ancient looking map? Here is how to make your very own treasure map.
 |
| The finished map. |
Wednesday, June 4, 2014
Color Grading
I've done very little color grading with my previous videos, but that is going to change after the great results of my recent project.
Here is an example of color grading, both before and after shots that I took as I share what I've learned from mainly trial and error and what little I remember of color theory.
Here is an example of color grading, both before and after shots that I took as I share what I've learned from mainly trial and error and what little I remember of color theory.
 |
| Original Image |
Monday, June 2, 2014
Do I Have Your Attention?
I got the chance to create flyers for the local Toastmaster's club. Toastmasters is an organization that helps develop speaking, communication, and leadership skills.
The goal was a flyer that would attract attention and provide basic information on the club, explaining what the club offers and when/where it meets.
The main hook is the image and text, thus it is centered at the top of the page. The logo follows on the page with what the club offers and then meeting times next.
The toastmasters logo has a gradient, stroke, bevel & emboss, inner glow, and a drop shadow applied. The white glare is a brush stroke with the opacity lowered. The rest of the text is formatted and sized according to importance.
Wednesday, May 28, 2014
3D Printing
I wish this were a post celebrating my new 3D printer. It's not. This is a post discussing the 3D printing class I recently finished.
The class served as an introduction to 3d printing and modeling, utilizing SolidWorks. While I had never used SolidWorks, I was one of two that already had a solid grasp on 3d modeling so the tasks were easy. The first class, I assisted three other people in completing the in-class assignment. The class only had seven people total.
The class served as an introduction to 3d printing and modeling, utilizing SolidWorks. While I had never used SolidWorks, I was one of two that already had a solid grasp on 3d modeling so the tasks were easy. The first class, I assisted three other people in completing the in-class assignment. The class only had seven people total.
 |
| The final project. |
Wednesday, May 7, 2014
Film Review: Valhalla Rising
Valhalla Rising is different. The first time I watched it, I wasn't sure what I had seen, but I wanted to watch it again. The dialog is sparse to non-existent, and the plot has a surreal quality to it.This is not a typical movie. This is a movie that is more artistic that most, and more artistic that most can stand. It is the very definition of an independent film. If that's what you like, then you need to see this film.
 |
| One-eye has glimpses into the future. |
Wednesday, March 19, 2014
Diorama for Dinosaurs Part 2
Picking up where we left off, the bases are built, the foam is glued in and shaped. Now it's time to start adding color and texture, but first we need to coat the foam.

Monday, March 17, 2014
Tile on the Floor: Part 3
Finally, there is actually tile on the floor.
 | |
| It is critical to mock up tile before you put them down permanently. Especially if you plan to have a pattern. |
Monday, January 20, 2014
Tile on the Floor Part 2
IMPORTANT SAFETY TIP:
If you house was built before 1980, and you have a vinyl tile or sheet flooring, chances are it contains asbestos. Don't panic. The best thing to do, is leave it.
I suspected the bottom layer of sheet flooring in my home contained asbestos, because it was put down in the mid 70s.
Since the second layer of flooring is glued to it, I'm leaving both layers. I will install the concrete backer board for the tile on top of the old sheet flooring.
If you house is newer, and you take the old floor out down to the sub-floor, I would staple down a layer of plastic first, before your concrete backer board. It doesn't cost much and it ensures water will not reach the sub-floor. With water lines running to the refrigerator, dishwasher, and sink; it's a good idea. Use 4 mil plastic. It can be found at any home supply store.
This is where we left the floor in part 1.

Monday, January 6, 2014
Tile on the Floor Part 1
One of the first new projects of the year is tiling the floor in the kitchen. I previously tiled the walls, floor, and shower in the bathroom.
This is the new floor. A gray ceramic tile.

The kitchen floor was the ugliest floor in the house when we moved in. Somehow we've replaced all the floors but the kitchen, but no longer shall it intrude.
There were three layers of resilient flooring. As I started removing the first layer, it didn't look too bad. It could be the basis for an awesome retro style.
 Then I saw this...
This is the new floor. A gray ceramic tile.
The kitchen floor was the ugliest floor in the house when we moved in. Somehow we've replaced all the floors but the kitchen, but no longer shall it intrude.
 |
| As you can see, the pattern is dated and the floor has faded. The previous owners had generously replaced some, but not all of the faded tile. |
There were three layers of resilient flooring. As I started removing the first layer, it didn't look too bad. It could be the basis for an awesome retro style.
Subscribe to:
Posts (Atom)