

I've thought about making a Boba Fett Halloween costume for years. When I watched The Mandalorian I knew this year's Halloween costume.
The Mandalorian is a great show and the costume looks awesome. There's a lot of parts and I never have enough time with Halloween being the due date. I worked from the helmet down, knowing that people would look at the helmet first and hoping they wouldn't look at the boots in case I hadn't finished them.
Purchase List (paid links):
- Black coveralls
- Chelsea ankle boots
- Black motorcycle gauntlet gloves
- Industrial safety gloves
- Face shield replacement
- EVA foam floor mats (4 pack)
- Craft foam
- Leather scraps
- Grey wool blanket
- Muslin perm press material
- Styrene plastic .04
- 1/2" Conduit
- Wood skewers
- Aluminum plate 14 ga.
- Aluminum angle 2"x2"
- 3/16" Pop rivets
- 1/8" Pop rivet
- Snap buttons
- 1" hook & loop non-adhesive velcro
- Acrylic caulk
- Half-time filler
- Plasti-dip spray paint (2) cans
- Rustoleum spray paint (1) can each (7 total): satin Chestnut Brown, Flat Red, metallic silver, satin Smokey Beige, satin Oasis Blue, metallic Bronze, stain Granite
- Acrylic paints: black, white, brown, silver
- pencil (I prefer a lead holder)
- marker
- chalk
- scrap paper for sketching and for protecting work surfaces
- painters tape
- duct tape
- hobby knife with replacement blades
- metal straight edge
- cutting mat
- band saw
- hack saw
- file
- rasp
- drill with 1/8", 3/16" bit
- dremel and sanding bit and cutting disk
- sanding block/220 grit paper
- heat gun to seal foam
- wood burning tool to create battle damage in foam
- sewing machine, black thread, white thread
- seam ripper
- rotary cutter
- leather punch
- contact cement
- hot glue/hot glue gun
- crazy glue
- wood skewers for stirring contact cement, painting hard to reach crevices
- black shoe polish
- paint brushes
- shop towels
- respirator with organic vapor cartridges - contact cement is toxic, so is spray paint
Introduction
I started with reference photos. I'm recreating the pre-Beskar armor. I like weathered and beat up props, and they're more fun to make. Plus I know I don't want to pay for a good looking chrome finish like Alclad and it takes time to get an automotive quality finish. I don't have time to sand/prime/sand for that perfect look.
I planned to work from head to toe, because the helmet is the most important part of the costume. Without that, the rest doesn't matter.
 |
| I sketched each part of the costume before building it. |
I used Punished Prop's Mandalorian helmet template. Everything else, I sketched a template on paper based on reference photos.
The armor is foam. It's an easy and forgiving medium. While floor mats are the cheapest option, the EVA foam geared for cosplay can be nicer and doesn't have the imprinted pattern on the back. At some point you will be sanding through the pattern because you need a flat surface.
I use contact cement to glue the foam. Wear a respirator! With foam being porous, you'll need two coats to prep it correctly. Wait for the contact cement to dry completely before gluing. You only get, one shot to glue it.
I used a sharpie to transfer patterns to the foam, tracing around the paper patterns.
I used styrene depending on thickness of the item, including the hand guards and shin armor.
This is a month of work, working most nights/weekends.
Foam - Helmet
I would have liked to use styrene or resin for the helmet, but I don't
have a way to shape styrene or a quick way to build a helmet to cast in
resin. A rigid helmet is the best way to get a screen accurate prop with
an automotive level finish.
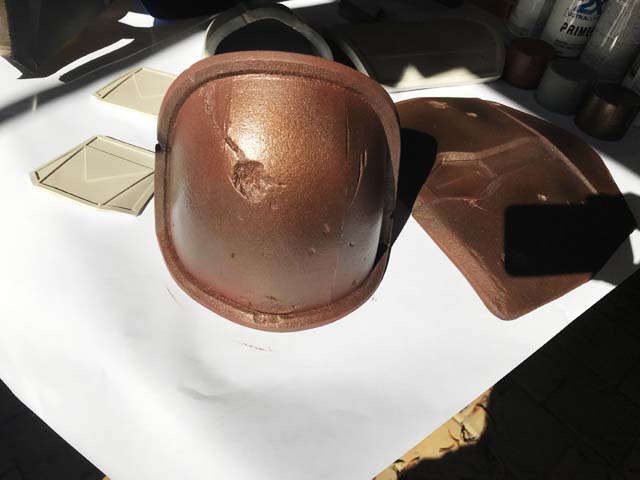
I knew what the finish would be on the helmet, and it's decent for foam.
Punished Props template makes quick work of building the helmet. The template even has registration marks for alignment. My only tip would be to pay attention to cuts/intersections. An angled cut depending on the curve/placement will get a cleaner joint. My joints around the dome were straight cuts, and the joint protrudes a bit, and thus I had to sand it down for a more even finish. An angled cut would have been more conducive to the curve of the dome.
I printed the templates, cut them out, then traced them in marker on the foam, adding the registration lines too. Those lines are a great help in putting it together.
I use contact cement to join foam. It's more effective than hot glue, doesn't produce thin strings of glue over everything, and doesn't add thickness. With contact cement, you don't get any working time. When you mate two surfaces they are stuck very well. If you mess up, you'll have to cut the pieces apart.
It helps to pre-curve pieces before glue up. You can heat treat them at this point or just shape by hand/on the corner of a bench.
The cheek pieces were cut on the band saw at a ~40 degree angle which gives them the inset.
I bevel cut the bottom edge of the helmet on the inside so it wouldn't look so thick and be a give away this is a foam helmet. I didn't bevel the visor cut out as the bevel would cause the visor piece to not sit flush. I could have done a rabbit, but it's difficult to cut a rabbit in foam with a consistent thickness.
I hot glued a temporary piece of foam to help shape the front as it lacks rigidity. The visor will help that. The ear pieces, top strip and rear vent are craft foam. The bevel on the ears is difficult with foam. I cut an angle on the band saw then sanded it smooth. I broke the ears into individual pieces and then assembled. Trying to build it as a one off is too complicated. A dremel/sanding bit rounds off edges as needed.
I sanded all joints as some of them were pinched/puckered. Angled cuts would have helped here.
The horizontal portion of the visor has a lip above it. I used craft foam to create the lip, and cut into the helmet at the bottom of the visor opening to blend this lip as it's only raised above the visor.
For the top strip, I used craft foam as a base and another scored for the actual strip on top of it to give it the right thickness.
If you haven't heat treated the foam, do that prior to plasti-dip. The foam will darken very slightly. If it darkens a lot, you're burning it. I used acrylic caulk over all the joints. A cup of water and my finger smooth out the joints and make them smooth. If I were doing this again, I might go over the entire helmet with watered down acrylic caulk. That would produces a smoother finish.
Since the helmet should have a paint finish, I used Half-time filler over the joints and in a few rough spots. As soon as it flashes and becomes solid, start sanding. It's easier to sand at that stage than when fully cured.
I did a base coat of plasti-dip and three coats of silver before adding the visor. I left the helmet outside after the Plasti-dip in the shade and the sun rose, leaving a portion of the helmet in the sun. This caused bubbles in the Plasti-dip and loosened a dome seam. I glued the seam back, cut the bubbles out and used Half-time to fill it. You can tell where I had bubbles after paint, but it looks better than it could have.
I created a template for the visor then cut the face shield large, trimming little by little before it fit. Then I tacked it in a few places with hot glue before using contact cement. I did sand the edges of the visor with 200 grit paper just to give the glue some grip.
I added a piece of upholstery foam to each cheek and at the back of my head. This keeps the helmet still as otherwise it would move when I turn my head. I didn't add foam to the top as that would have raised the helmet too high.
BE CAREFUL with contact cement on the visor, it will mar the plastic. I used acetone to clean it up, but it left a streak on the vertical portion. I might could have buffed that out. The other option is to use hot glue for the visor. It won't mar the visor and it will just peel off the visor. Hot glue can be pretty strong.
 |
| I created the helmet from EVA foam floor mats. |
 |
| I labeled each piece while cutting to make assembly easier. |
 |
| Contact cement attached the foam. |
 |
| The Punished Props template is based on Boba Fett so the cheek pieces are rounded when they should come to a corner (bottom). It took a few tries to get the cut angle correct, which was done on a band saw. |
 |
| I cut all the foam at a 90* angle, but it would have been better to angle it depending on the joint to facilitate better attachment and avoid mild puckering. |

 |
| A temporary piece of foam holds the front in place until the visor is glued in, otherwise the front is too flimsy. |


 Foam - Chest Plate, Armor, Gauntlets, Leg Wrap
I
created paper templates for the pieces, then attached them to me, took a
picture, and modified as required. An eye test isn't always enough.
What looks good to the eye, may look small/large in an image.
Test fit wearing the flight suit. It can be a pain, but it ensures accuracy.
With the chest plate, I guessed on the size based on reference images and where the belt and collarbone were, using those as references to size the chest plate to me. Most of my templates had at least a few iterations.
For the chest plate, I cut a beveled triangle on the inside to create the curves around the perimeter and the curves around the chest. The chest emblem is craft foam with a floor mat backing. A dremel rounded all the edges. I used a sanding block too, if I needed to feather edges when dremel wasn't doing it.
For the shoulders, I used (3) pieces of foam with curved cuts so that piece would curve around my shoulder when glued up. The right shoulder has (2) strips of craft foam for seams.
The left shoulder has a trim that I used a dremel on to get a bevel. I also dremeled the floor mat pattern off of the foam so it would glue flat to the shoulder.
The thigh armor is a single piece of foam. the trim is more foam floor mat. I cut all joints tight and used the contact cement to get tight joints. Gaps just don't look good.
For the foam armor trim I ripped the
foam on the band saw. To do this safely, use two pieces of plywood with
the foam sandwiched in between.
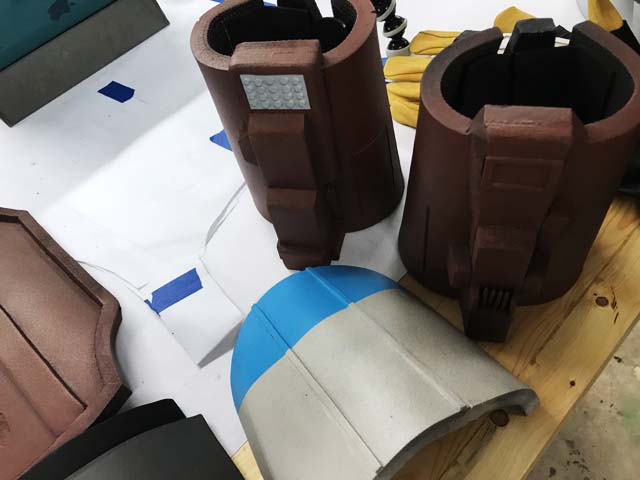
The gauntlets are floor mats
as well. They look too big/thick, but too late to fix that. I built them
up piece by piece. I sized them to my arm in the flight suit, but not
to my arm in the jumpsuit AND glove. I had to add stretchers so they
would actually wrap my arm when wearing the gloves. I added a foam
triangular strip/flap with velcro on it to close the gauntlets.
The mini-missiles on the right arm are wood skewers. The circles on the left are .04 styrene glued to a styrene plate that is recessed into the foam. I used a leather punch on .04 styrene to get perfect circles. To get the spacing right, I created a grid on paper, then put the circles down in the right location. Very carefully I put painters tape over the circles and caught each one. Stuck to the tape, the circles can't move, so I then glued them to the plate.
The leg wrap is composed of
five pieces. The upper strip is two pieces of craft foam, one thinner
than the other for the banding. The top edge rolls over a piece of foam I
rip cut to give it a thicker look. The piece below that is craft foam. I
heated it up and then scrunched it down to simulate wrinkles. I had to
do this a few times.
Below that is a band, and below that is craft
foam scored every .5". I heated the bottom edge and flared it by just
pulling on the edge. Make the scores very thin. Heat will open them up
and the craft foam is thin to begin with.
These pieces are all glued
together so the leg wrap is a single piece. The velcro attaches at
different points. For the top band the velcro is at the outside of my
leg, behind the 4"x4"x1" craft foam pouch. The wrinkled piece of craft
foam has no velcro. The band below that has velcro on the front inside
portion of the leg. The scored wrap has velcro in the back. The velcro
placement differs so it could be hidden the best.
After the
armor was done I heat treated and curved it to fit my body. I then used
reference photos to add damage with a wood burning tool. Be careful,
this can go right through foam, but it's great at creating pock marks,
scratches, and blaster impacts. The chest plate has two dominant blaster
impacts.
 |
| I mimicked the curves in the helmet for the pauldrons. |

 |
| A wood burning tool creates the blaster marks. |


 |
| A bevel was cut to get the curve. Since the foam doesn't want to keep that joint, I used duct tape. |


 |
| Heat treating the foam will turn it darker and give it a sheen. |
 |
| Too much prolonged heat and you can burn the foam. |
 |
| I labeled all pieces "L" left and "R" right just to keep locations correct. |


 |
| Leg wrap. |

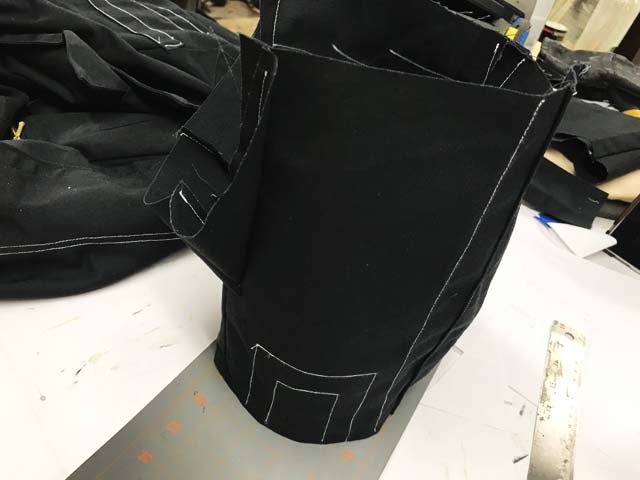
 Cloth Goods - Flight Suit, Half Mask, Torso Wrap, Vest, Cape, Gloves
The flight suit started as coveralls. I cut off front pockets, hammer loop, and sleeve pocket.
I cut the sleeves and resewed them to look like double sleeves. I added a lot of white stitching to simulate the prop. There are lines on each upper arm. I spaced mine .75" with the center at 1.5". There's a diamond stitch pattern on each elbow. There's an additional strip from the inside elbow to collarbone outlined with white stitching. That one is 1" wide.
I used chalk to sketch out straight lines before sewing them.
I added stitching on the arms before sewing the sleeves back together. This makes access MUCH easier.
There's white stitching around the fly and curving from the outside knee to belt buckle.
The half mask covers my neck/chin from view. I wear the collar of the flight suit up, with the half mask on top. It extends half way up the back of my head, around my ears, and down to my chin. I cut 10" off the bottom of each pant leg for the half mask. I cut the leg down the seam and added 2" from the other leg to lengthen it. The half mask has white stitching on each side of the neck that is spaced 3/4".
I added a strip to the back outlined in white with velcro.
The
torso wrap is a muslin material. I had this on hand, but probably used a
few yards. The wrap is double thickness as the material is thin. The
wrap has a center section with horizontal banding on the sides. I used a
template for this, 'trying it on' to make sure it looked right.
I
created separate sections and sewed them together. I dyed it with tea
just to change the color a bit. If I had time I would have sprayed it
with watered down dark acrylic to make it even darker.
I added
snap buttons at each top corner with a corresponding snap on the lower
back shoulder of the flight suit for attachment. I used a leather punch
to create the holes for the snaps.
The chest plate vest is muslin. I created a paper template to make sure it looked right, using my chest plate as reference for size. The straps are leather scraps. The vest was too short after I sewed it together. I used a seam ripper to cut the straps on the back. Instead of replacing them, I just added an extension. While there is a seam, the cape will cover it.
The cape
is a wool blanket. Cosplayers have done it from fleece and the pill of
the fabric in reference photos makes it look like fleece, but I liked
the look and feel of wool better for the cape.
At the neck, the right
corner comes straight down from the back over the shoulder with the
other side coming over the left shoulder and across the chest. The cape
is 30"x60". Looking at it in plan, on the long side, the cut curves out
for the piece that comes across the chest. So at the top the cape is 36"
wide with a roughly 12" long curve
I sewed that and the wrinkles together. It wouldn't wrinkle 'right' on its own.
I
cut the neck opening a bit larger so I could slip the cape over my head
easily and to get rid of the excess material at the back of my neck.
I used scissors to cut the bottom edge, taking out small triangles. Then a rasp to distress the fabric
The gloves are the black gauntlet gloves over the yellow gloves. Cut the black gloves close to the knuckle. I glued velcro onto the back of the black gloves for the plastic hand guards.
 |
| I bought coveralls, gloves, and shoes. |
Once the gloves are
done, get black shoe polish and rub it into crevices to give the gloves a
worn look. Start in a spot that doesn't show to get a feel for it. I
focused on the yellow gloves, you won't notice black shoe polish on the
black gloves.
 |
| A rotary cutter is great for cloth as it allows you to keep it flat which helps when cutting around a template. |
 |
| Vest. |


 |
| Torso wrap. |


 |
| I cut the sleeves of the coverall to simulate the double sleeve effect. |

 |
| Chalk lines act as guides to keep stitching straight. |


 |
| Cut the black gloves close to the knuckle. |
 |
| I cut part of the pant leg to make the half mask. A velcro strip runs along the back. |
 |
| The half mask wraps around my chin and the back of my head so that my neck is not visible. |

 |
| The bottom edge of the cape. |
 |
| Cut with scissors for a ragged appearance. |
 |
| A rasp gives it the worn look. |
I used real leather for the belt and bandolier. You could use craft foam, but leather looks better and is more durable. I ordered scraps with no guarantee on color, but I got a nice brown color that works. The alternative would be to use shoe polish to get the color closer to accurate.
The belt and bandolier are double thickness except at the grenades. Both are 2" wide, stitched along the outside edge.
The belt has a ~1.5" circular leather feature with a bottom. I couldn't figure out a good way to attach the bottom and didn't.
As with all the pieces, these started as paper templates.
For the (2) belt grenades I used 1/2" conduit with foam pressed into each end. It's rudimentary but worked for my time table. From 10' away it looks great. The grenade loops are 1.625" long with the loops attached on the belt spaced at .75". At the circular feature and grenades, the belt is single thickness.
The belt also has a 4"x4"x1" leather
pouch. It's the same size as the foam pouch on the leg wrap. I cut floor
mat foam to size as a base and wrapped the leather around it. My
leather is to thin to hold shape, but that thinness makes it easy to
work. The pouch is one big piece of leather adhered with contact cement.
I made a belt loop that runs through the pouch. The rivet in the pouch
is 3/16".
The belt buckle is a piece of scrap aluminum I had. I cut it to size with a hack saw, then filed the edges true and flat. I drilled out the notches on the drill press with a 3/16" bit. The rivets are 1/8".
I tried (and tried) to sand the paint off the buckle
but it seems it was powder coated and well adhered. I left it as is, but
the edges are raw aluminum, giving it a worn look.
The back
of the buckle has an aluminum angle (1"x.5") as the clasp. I cut an
opening into the angle with a drill and file. The other end of the belt
loops into the angle and fastens with velcro. With the angle on the back
basically centered, the buckle wants to flip out. The angle/loop needs
to be at the outside edge. I didn't have an angle the correct size.
Using a 2x2 angle with one side cut down to .5" would fix that issue.
The bandolier is double thickness leather except at the grenades. There are (6) loops and (5) grenades. The sizing/spacing is the same as the belt as I used conduit here too. There is a square piece of leather with an opening above the grenades.
I did not include the rifle clip. I was going to create the base clip/snap, but forgot.
The bottom of the bandolier attaches to the belt with velcro, piece on the inside of the belt and velcro on the end of the bandolier. The other end of the bandolier attaches to the back of the flight suit with velcro on my shoulder blade.
The grenades are 1/2" conduit. I have (13)
total: five on the bandolier, two on the belt, six on the shin. I cut
them 2.75" long with a hack saw. I then filed the edges flat/true and
deburred the conduit. I pressed the conduit into scrap foam and cut the
imprint left. I applied contact cement inside the tube and pushed the
foam into the end. Don't let the contact cement dry and do not put it on
the foam. If you do, you won't be able to get it into the tube and
adjust it. The foam stays in place well with just a friction fit and
hopefully with the contact cement it won't move at all.

 |
| The "grenades" are all 1/2" conduit |


 |
| The belt buckle started as scrap aluminum. |
 |
| Cut to shape. |
 |
| Edges filed to be straight and true. |
 |
| A punch marks where to drill. |
 |
| Drilling the openings. |
 |
| Cutting what the drill left behind, which was then filed straight. |
 |
| Almost complete buckle. It was powder coated, so I gave up trying to remove the paint. |


Plastic - Hand Guards & Shin Guard
The
hand guards are .04 styrene with .04 styrene trim and a triangle. The
outside edges curve slightly around the hand. After finishing these,
they look a bit too large. To get the bend, I heated the plastic and
clamped it between two pieces of plywood. Don't heat the plastic to much
as you don't want it to deform. You want it just warm enough to bend.
It may take a few tries to get the bend correct.
The shin guard is a single piece of styrene with styrene banding around the top. The triangular piece is styrene base with foam triangles. I don't like how the triangles came out, but it's a small detail that will likely be ignored.
I scored the front to mimic the grooves and that was a mistake. I know that if you score styrene you can just snap it. I should have added strips of styrene on top of the base to create the effect. It was too late in production to fix this correctly.
I heated the plastic to curve it around my leg. It needs to be an oval shape.
A craft foam wrap at the bottom with velcro on each end and a craft foam grenade holder at the top secure it. I added velcro on the styrene too as the plastic just doesn't like holding the curve.
 |
| Hand guards are .04 plastic. |

 |
| Leg armor is a 'for sale' sign which can be a quick substitute for .04 plastic sheet. |
 Rigging
Lots of velcro was used to attach the armor. While I used adhesive
backed, that's only because I bought the wrong thing. When attaching
velcro to the suit, I sewed it on. With adhesive backed, that gets
adhesive on the needle so you need to clean the needle frequently.
When
attaching velcro to foam, I applied contact cement to the foam. The
velcro didn't need any since it was adhesive backed. If it didn't have
the backing, just apply contact cement to the back of the velcro.
The chest plate has (4) pieces of velcro, one for each corner. Shoulder and thigh armor have two strips each running horizontally at the top and bottom.
Each shoulder pauldron has a vertical strip. The hip
plates have a horizontal strip attached to the torso wrap and a single
square towards the bottom of the plate on the suit as the belt made the
plates want to flip out.
I used painters tape to match up the location of the velcro on the armor with the location on the flight suit. Sometimes that doesn't work as I added a second strip to the left shoulder pauldron as it attached a bit too far forward.
 |
| Contact cement glues velcro to the foam. |
 Finish & Paint
All
foam gets heat treated before paint. A heat gun pointed at the foam for
a few seconds will do it. The foam will become a bit darker and develop
a sheen. This seals the foam so it absorbs less paint.
Once the foam is sealed spray the foam with Plasti-dip. It's a durable, flexible base for the color. There are other options like thinning PVA glue (white Elmer's glue). I've never tried it.
I used acrylic caulk for the seams of the helmet and shoulders. Thinning it with water and using your finger works well.
For
the tan pieces, I sprayed a base of tan, lightly misted with gray, and
then misted again with tan if needed. A single solid color looks like a
toy. A mottled appearance looks real.
For the brown pieces, I
sprayed them brown, misted with gray and in some cases red-brown, then
repeated colors until I got the right shade. For the chest plate, and
left shoulder I added in bronze. I made the chest plate more bronze, and
the gauntlets more red.
Mottling the colors makes the armor look more realistic. It also gives all the armor a similar shade of color even if the tone differs.
I didn't mottle the 'leather' leg wrap. Leather doesn't look mottled.
Check the paint cans to determine drying time. You should paint outside in a well ventilated area and even then wear a respirator.
Leave all items in the shade to dry, direct sunlight can cause the paint to bubble.
I
left the helmet in the shade, but as the sun rose it was in direct
sunlight, causing the Plasti-dip to bubble. Being a rubber coating a
bubble in Plasti-dip is more difficult to fix than regular paint as it
won't just sand or cut out. I cut it the best I could and used Half-time
to smooth out the mess.
Weathering is the final stage of
painting. It gives the armor a used and worn look. Think about how
things would wear. While the bottom edge of the cape doesn't look dirty,
it should be. I didn't paint it because I ran out of time.
Armor
pieces may have a primer between the 'metal' and paint finish. When I
have more time I like to paint pieces with Plasti-dip for a durable
base, then silver for metal, then white or gray for primer, then the
final color. I didn't have time here. Instead I dry brushed silver onto
the edges.
Cloth goods will be dirtier under armpits, at
knees, and bottom of pant legs. If I had time I would have sprayed the
chest plate vest and torso wrap with a watered down dark acrylic.
I've used water color, acrylic, and oil paints to weather; mostly what I have on hand. Water color is better if you want to try to clean the item up later. Oil is a lot less forgiving, once you wipe it on, it will wipe off but tint the final color. It's great depending on the type of dirt you want to imitate. I stick to acrylic. It thins and cleans up easily with water.
The entire helmet needs a dark wash, it's much
too bright. Acrylic will just wipe away. I did a test on the back with
oil. It dulls the silver with a nice dark tint. While leaving crevices
darker. I wiped the oil paint on as thin as I could then wiped it off
with a clean rag. Change rags often. You can use acetone to cut through
the oil paint, but be careful as it will also cut through your base
coat. I used some acetone on the ear pieces as they are lighter. The oil
paint wipe darkens the helmet and makes it look a lot better.
With all the pieces, brown and/or black will get wiped into cracks and crevices and gently wiped away. This leaves the paint in corners and lends to a dirty and used look.
The flight suit got sprayed with
watered down white and brown. It looks much too new. I only did one
spray and didn't notice a difference, with more time I'd like to spray
it again. I may test wiping thinned paint directly on it to dull the
black.
For the armor, I used black oil paint around blaster impacts. Then I painted the impacts with silver. I also dry brushed edges with silver. Dip the brush in paint and then blot it. You want very little paint, just enough to highlight the edges. I used black paint in crevices and corners. Weathering gives pieces depth. The low points are darker, the high points are brighter.
I wiped shades of brown and black on and off to give a dirty appearance or streaks.
 |
| Acrylic caulk fills any gaps. |


 |
| Plasti-dip base coat. |

 |
| Since the helmet should have a very smooth finish, I used Half time filler. |

 |
| Left it in the shade, but the sun rose and got the helmet, separating this joint and leaving a few bubbles. This required another round of Half time filler. |

 |
| Silver paint. You can't get chrome in a spray can, at least not without spending a fair amount. |


 |
| Plasti-dip base. |
 |
| Red color coat followed immediately by a misting of brown. |
 |
| A few sprays of gray, not all over, just in a couple spots. |
 |
| A light coat of bronze. |


 |
| The visor cut to fit the helmet. |

 |
| A black oil wash. Acrylic will wipe off completely, oil doesn't. Since I wanted to knock down the silver, oil was the way to go. |

 |
| The base color is brown, misting of gray, and coat of bronze. |

 |
| The silver is acrylic. The black burn marks are oil. Oil gives a slightly dirtier look. |
 |
| Acrylic was used for a streaks/scuffs. That way I can removed them competely and start over if I don't like them. |
 |
| The pock marks are painted with silver acrylic. |

 |
| The leg wrap had a very plastic look to it as I did a base coat of only brown, no misting. I used a darker acrylic to highlight the bottom side of the wrinkles. |


I knew I would never have time to build the rifle or blaster. Those are projects on their own. That and many places don't like props that look like weapons.
I wanted to build the vibra knife that's stuck in Mando's right boot. I also wanted to create the boot spats to better match the actual suit, but that didn't happen either.
A few more
days of paint and weathering would have been nice. The one thing I
really wanted done was the old/worn nature of the suit. One spray down
of acrylic didn't do the trick.
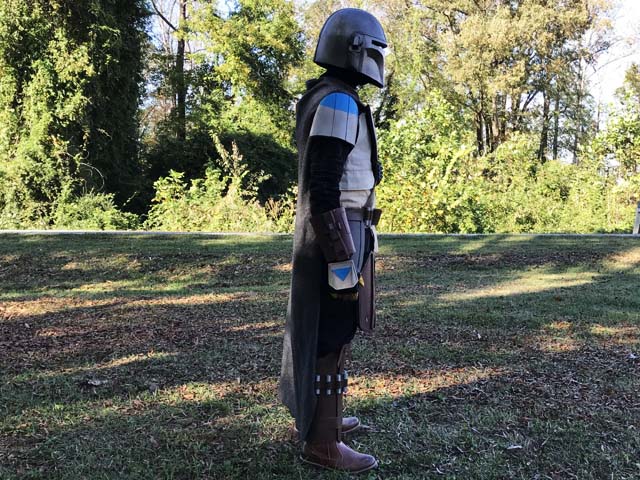
Conclusion
The
first test fit was a fun moment. Finally all these pieces look like
something. It's a fun costume that many recognize. I knew with building
the helmet out of foam it would never be a display piece. It came out
slightly better than I expected. I had time constraints, and I'm not
sure how I could create it like I want without a 3d printer, a CNC, some
combination thereof, or creating a tooling foam buck for molding.
It's not a difficult costume to wear, though you lose your lower periphery vision in the helmet. The plastic shin armor scrapes on the shoe. A piece of craft foam on the back bottom edge may quiet that down.
It's a fun costume. It puts a smile on my face every time I try it on.


No comments:
Post a Comment