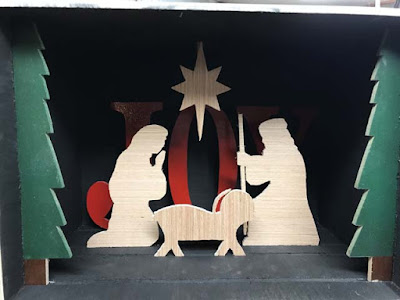
I like the idea of these, I just needed an idea. With the holiday season, inspiration struck
I made it Christmas themed, though for my personal use I'd want something darker, post apocalyptic.
Purchase List (paid links):
band saw
Introduction
I started this in Sketchup to get an idea of relative size of the pieces and to figure out how big the box needed to be.
It's 12"x8"x10" deep with a false back wall to hide the wiring for the lights. Tracks are routed into the bottom to add surface area to glue the figures and letters. I did cut gussets for all the figures for extra support. I used wood glue and hot glue for all the pieces, the hot glue holding them in place for the wood glue to set.
Boxes
I made the boxes first. I routed the grooves into the bottom plate before glue up. There are also grooves on the side walls for the tree and interior plate and a groove in the top plate for the interior plate The interior wall ensures the box glues up square. Dry fit everything and trim/sand as needed. Wipe away excess glue after clamping the box together lightly. Don't cinch it down. Any glue not wiped away will need to be removed with a chisel later.
Test fit everything before glue up to make sure joints are tight. Once glued up, sand the faces and edges so it's smooth.
For
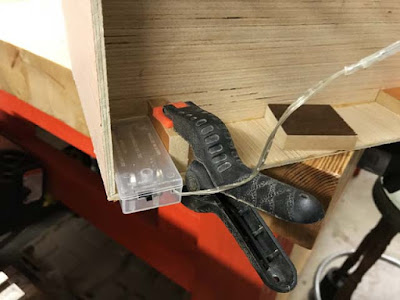
the back wall, I added blocks to act as stops for the back wall. I want it semi removable. The
back wall has a notch cut out for the battery box which is tension fit. The battery box extends past the back wall just so you can grab it and pull it out to replace batteries.
Figures
I
sketched the project in Sketchup first to get an idea of size it. Here
is the template I used to cut out the figures on the band saw.
I tried to cut as close as possible to the lines while not cutting into the outline. Flat and round files can knock down any rough spots and fix any potential mistakes in cutting.
I cut small gussets out of the 1/8" ply to support the figures. The gussets are roughly 1"x3/8".
Paint
I wanted the outside of the box to remain unpainted, so I taped it and painted the inside black.
Lights
There are eight LEDs on the string of lights. I drilled an 1/8" hole (check your LED size) into the back wall and then hot glued the lights into place from behind. I duct taped the wire to the back wall just to avoid tension on the lights.
The back wall is hot glued in place. I want it somewhat removable in case the lights go bad or the hot glue bond lets go.
Finish
I painted the trees and the joy letters, leaving everything else unpainted.
I glued gussets to the backside of all figures. Since the bottom plate has tracks cut in, account for that when you glue the gussets. They can't be flush with the bottom of the figures.
The trees run full height, so test fit before install and trim if
needed. I used wood glue and hot glue on the figures. The hot glue holds
them in place so the wood glue can dry.


No comments:
Post a Comment