

I've always wanted a better way to mix spray paint than shaking it by hand.
I've seen a mixer that is a jig saw attachment, but my jig saw quick disconnect isn't that quick. I recently saw a drill powered spinning mixer on Tested's Youtube channel. Doubtful that spinning would properly mix, the video convinced me. With the product costing $50, I decided to make my own with scrap.
Purchase List:
Angle grinder with 4" cut off wheel
Riveter
Vice
Metal punch/ hammer
Introduction
I've always wanted a spray paint mixer. When I saw this one, I knew it would do what I wanted and I could make it out of scrap.
The mixer is composed of a tube, the base which fits inside the tube, and the bolt. The foam on the top inside edge of the tube helps the can stay in place with friction, providing enough compression.
Video Tutorial
Tube
The tube's height is 5.5" because that's the height of the scrap I had. It's 13" long which is as short as you can make it and still have room for the foam and can.
 |
| The curve of the tube shaped with differently sized paint cans |
 |
| Clamping the tube for attachment |
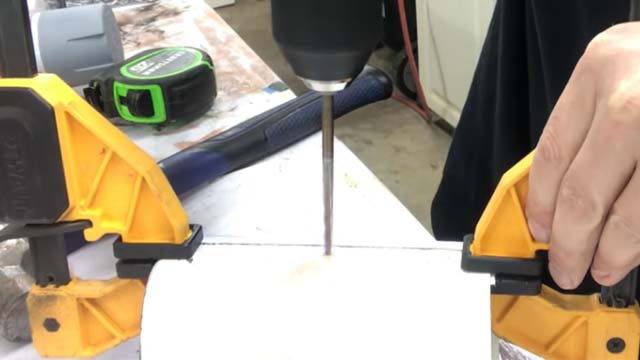 |
| Drilling holes for rivets |
 |
| Riveting the tube together |
 |
| Inside of the tube showing rivets |
Once it was cut to size with the cut off wheel, I used a spray can and a larger can to curve the sheet metal. The spray can helps to start the curve, while the larger can helps maintain the desired radius. I clamped the ends with a .5" overlap. I drilled (3) 3/16" holes along the seam, then installed the 3/16" pop rivets with a riveter. I used a punch on the holes before drilling to prevent the drill from walking.
Base
The tube isn't perfectly round, which is okay. I traced the opening onto the sheet metal. I then sketched 4 tabs around the base, .5" square in shape. I clamped the metal to my work bench and cut the base out with a cut off wheel as close to my sketch as possible.
I used a vice to bend the tabs up, making sure the bend was inside my sketch line so the base would fit inside the tube.
 |
| Sheet metal base shaped with a cut off wheel |
 |
| Bending the tabs of the base on a vise |
The base is a tight fit in the tube which is good. I drilled through the tube and each tab and installed 3/16" pop rivets. I punched the holes first.
I then drilled a 1/2" hole for the bolt. I made it slightly off center for centripetal motion. I feel like that will mix the paint better, but it's just a guess.
 |
| Plywood sandwiches the foam to cut on a band saw |
 |
| Bolt, washer, and nut. |
 |
| Foam glued to the interior perimeter |
A fender washer on each side of the base with the through bolt and nut.
Foam
I used the interlocking edge of a foam floor mat. It's cut to about 12" long. I had to cut it on a band saw vertically to make it thinner so it and the can fit in the tube. To cut it on the band saw, I sandwiched the foam between two pieces of plywood to keep my fingers safe.
I applied contact cement to the back of the foam and to the inside of the tube, let it dry for just a couple minutes so it was still wet and allowed for working time. I positioned the foam at the top of the tube.
Conclusion
I filed all the metal edges so they wouldn't be sharp. I like the frame bolt as the end is a hex shape which fits in the drill well, but a regular bolt would provide enough grip.
This works exactly as intended, and it requires a lot less effort than shaking by hand. I'm sure thirty seconds of using this mixer is better than two minutes of hand shaking.


No comments:
Post a Comment