

I saw a method of applying self-leveling concrete on top of existing counters. The price is only $60 (or so I thought), so even if it's a bust I wasn't going to be out much. I ended up spending more than just $60, needing additional self leveling concrete to correct mistakes and a new brand of sealer.
While I'm doing counters, I might as well replace the backsplash. I'll worry about the counters first.
 |
| I started with a lovely yellow flower patterned laminate counter. |
- (2) 50lb bag self-leveling concrete - the amount depends on the size of your counters
- (1) quart densifier/sealer I ended up changing to Cheng's sealer
- Cheng's wax for the sealed counter (food safe)
- 1/2" MDF to create forms around existing counters. I need 39'-0"
- drywall screws for wood forms
- (1) container of caulk for form joints
- Wax for the wood forms
- painters tape to create a separation between the backsplash and concrete
- Acetone for cleaning the existing counters
- Orbital sander
- 40 grit sandpaper
- Belt sander & sand paper, I needed this to correct mistakes
- plastic drop cloths/sheeting
- paper towels
- spray bottle
- saw
- 5 gallon bucket
- Vacuum
- $150. I spent $130, I already had wax, caulk, and wood for the forms.
First I measured my laminate counter tops. I've got 42 square feet and 17'-8" linear feet for the back splash. I planned for 3/8" thick concrete on top of the counter and did a volume calculation to determine how much concrete I needed. I ended up using more to correct mistakes.
 |
| Remove everything from the counters. |
 |
| Clean well. Acetone helps. |
I had a 3/4" hole through the counter the previous owner gifted me. I glued in a wood dowel and sanded it down flush. Put drop clothes under the counters, tape them down. This will catch the resulting water and any concrete in the future. Don't turn this into a flooring project too.
Once the counters were clean I used an orbital sander and 40 grit sandpaper. I wanted them rough to, again, promote good adhesion. I had a spray bottle with water to reduce dust. Drop cloths and paper towels are handy here for excess water.
Sand the top and faces of the counter. Even if this was tile or another material, the process of cleaning and sanding is the same.
 |
| I removed the metal angle, and a lot of the laminate. I should have left as much laminate as possible. |
 |
| The sink was also removed. |
 |
| I didn't like the idea of wood exposed to water/concrete so I applied contact cement to the exposed wood areas. |
Since I was concerned about the water in the concrete and the wood counter base, I coated the wood counter in contact cement, hoping it would prevent the wood from soaking up so much moisture. Particle board and water don't mix. I guess it worked.
Forms:
Once the counters were sufficiently torn up I cleaned them again. Then I measured for the forms. I cut lengths for the horizontal and vertical faces of the mold. You want as few joints as possible as they do have the chance to show in the finished product.
 |
| This is the opening for the oven. The form will be flat against the counter so the opening width is not reduced. |
 |
| The bottom of the form was screwed in directly to the under side of the counter. |

 |
| I used MDF spacers to set the form for the face of the counter to ensure uniform thickness. |
 |
| The spacers were removed after the form was screwed in place. |


 |
| Laminate to match the radius corners of the sink opening. |

Before the forms were in place, I waxed the face of them so that the forms will remove from the concrete easily after the concrete cures. Some of the joints are just too tight to reach with wax after the form is together. I didn't know if I could wax the joints to prevent leakage. I thought about caulk, but didn't want the bother so I tried to wax the inside joints and tape the outside of all joints. As I learned, tape won't catch everything, but I only had one major leak and a few small ones.
 |
| Tape all joints, or better yet, caulk. |
 |
Tape the backsplash where the concrete will intersect. |

Pouring Concrete:
I mixed the self leveling concrete in a 5 gallon bucket. I mixed 12.5 pounds and 46 ounces of water at a time. You can't fit the full 50 pounds and water in a single bucket. The counters did require multiple pours.

 |
| It looks good, but looks are deceiving. |


Pouring the entire contents in just one spot isn't going to work. With wall cabinets, you can't reach the back of the counter,, pour as close as you can which will likely be at the midpoint of the counter. Start at one end and pour a thin layer across the cabinet. Then pour another line towards the front. You'll need to pour more lines towards the front as the form for the front face will take more concrete. While pouring you want as even a distribution as possible with very thin layers to build up to the desired thickness. Try to coat the entire counter with a very thin layer, then pour a thin layer over that, slowly building to the correct thickness.
 |
| Finally a good pour... wait what's happening in the back corner? A leak! |

I taped the joints, thinking I didn't need caulk. That held true except in one spot where my counter met the wall. I had a leak, and that led to the concrete leaking out drying slower than the rest, which created a nice crack. Without leaks, the self leveling concrete is dry to the touch in a couple of hours. I did have a few small leaks, but they were just a few drips of concrete.
My first pour was not good. I underestimated how much self leveling concrete would actually level. If I could start this over now, I could do a better job. My last section of counter was a good pour and wouldn't have required any patching if I didn't have a leak.
After the concrete has been poured, slapping the base cabinets helps air bubbles rise to the top.
I let the concrete dry for three days before removing the forms. The forms came off easily. This is why the forms were waxed.
Correcting Mistakes & Lessons Learned:
I should have poured to create really thin layers, slowly building to the desired thickness. Slowly pour from one end of the counter to the other. Self leveling concrete only levels to a certain point.
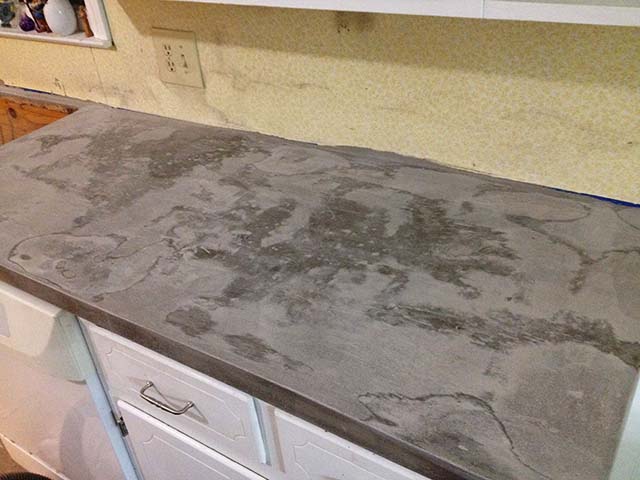
 |
| The pour looks okay. |
 |
| Except it had a lot of low spots that needed filling. |
 |
| It doesn't blend well, spot filling concrete. |
 |
| This is the point where I question my sanity. I never want to see a belt sander again. |
 |
| This section would have been perfect if not for the leak on the left side at the back. |
With self leveling concrete being 10x the price of regular concrete, I started to wonder if building a form for the entire counter top with melamine laminated mdf and metal mesh would have worked better. I could have set the vertical height of the form to the actual height of the counter and troweled (or straight edged) the form to have a flat bottom, ensuring the top is flat against the melamine. I also wouldn't be as concerned wasting the concrete since it's $5 a bag instead of $50 and I wouldn't be doing that in my kitchen.
Self leveling will work. If I could do this project again with the knowledge I've gained I could complete it with minimal sanding, basically just polishing. What I should have done after my first bad pour is to knock down the high spots, just a once over. Then I should have re-poured the entire thing in thin layers. While this would create a thicker counter, it would be level and flat and not create a ton of dust when I belt sanded the counter and attempt to level it. You just can't get perfect level with a belt sander.
If I knew how to pour this the first time it would have worked out much better. A patch or patches can work if the base is already level. I poured on an un-level base and just added to it. It would have been better to pour a thin layer on top of the entire counter to achieve level.
My second pour went very well, aside from the leak. If not for the leak it would have been perfect Caulk joints!
Sealing:
I gave the concrete three days to cure before removing the forms and another week before sealing. Before sealing, I went over the entire counter with an orbital sander to polish the concrete.
How do you know if the concrete is dry enough to seal? To test this you place a piece of rubber on the counter. If there is a wet spot underneath after 2 hours, it needs to dry for longer.
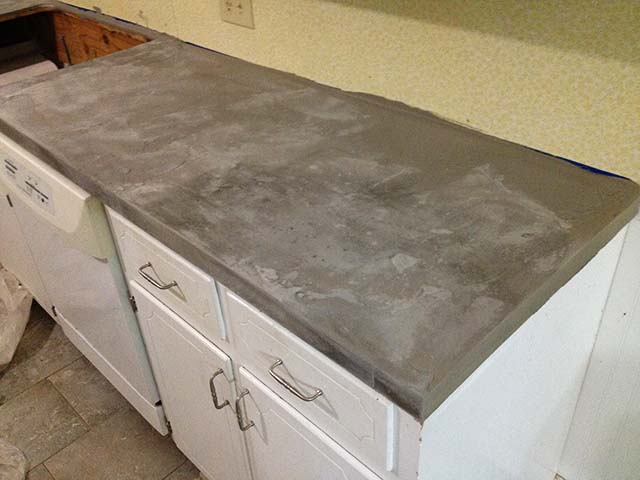
 |
| It's more level than it looks. |
 |
| Fresh coat of sealer. |
 |
| And another coat. |


 |
| Finally a bit of sheen. |


After 8 coats or so (I lost count, it could be 10) and nearly through the 1 quart bottle that said it would cover 500-700 square feet, my counter was still not sealed. My counters are 24.5 square feet.
I changed sealer brands due to how little the first one covered. The counters did take on a bit of a sheen as the sealer got closer to full saturation after using up the brush on sealer, but it still didn't pass the water drop test. The counters had more of a slick feel, rather than chalky.
With the Cheng's sealer you mix with water and saturate the counter, slowly ending with a more concentrated solution of sealer. This brand seemed to work better, but I also had a base built up. Once you think the counter is sealed, do one more coat. I've found a few places after the fact that weren't fully sealed. I can see them turn dark if something wet sits on them. Pay close attention to around the sink to make sure it's sealed well. Most of my counter is sealed well, but I do have a couple spots that aren't.
Waxing:
Once the counters are sealed, apply the wax. I applied it with one cloth, let it sit for a few minutes then buffed it with a microfiber pad. I did three coats, and you will need to re-wax periodically for the best result. It's unlikely I actually will wax it in 6 months to a year, but I should.

Future:
I have three separate sections of counter. I have not done the island yet. Should I create forms and build a stand alone concrete counter for the island? Maybe, but I've learned a lot. I will use the self leveling on the island, I will caulk the form joints, and pour with no leaks which should end with a level finish. Since there are no wall cabinets, I'll be able to reach every square inch of the island. I will pour very slowly, spreading the pour as much as possible. Then I just need to polish it with an orbital sander and finish it.
 |
| One day, I'll finish this job and concrete the island. |
Bonus Sink Replacement:
I also replaced my sink with a new stainless steel dual bowl unit. I would have preferred the sink deeper than 8", but that would have been a near 50% increase in cost.
Before mounting the sink, install the hardware first. There isn't a lot of space once the sink is in place. The handles should have a spot for a wrench at the bottom of the shaft so that you can hold the handle in place and tighten the nut. Make sure the nuts are tight, it's a lot easier with the sink out than in.
Installing the hardware with the sink in place is much more difficult if you don't have any specialized tools. With the limited space tightening the nuts can be tricky. Is a specialized basin wrench worth it? It seems like it.
Some sink hardware uses a plastic nut which is much easier. I ended up replacing the faucet as after re-installation it had a leak. The new faucet had plastic nuts that were super easy to install and so far are still holding strong.
With the hardware installed on the sink, run a bead of silicone caulk around the bottom perimeter, just to note this is a top mount sink. Place the sink, and then use the screws and clamps that came with the sink that hold it down. Space is limited and it won't be fun.
I ran another bead of clear silicone around the sink to ensure it was water tight.
To install the sink strainers, you need plumber's putty or silicone caulk. Run it around the perimeter of the strainer on the underneath side. The rubber washer and cardboard ring go on the bottom. The cardboard ring prevents friction between the collar and rubber twisting the rubber washer out of place.
The drain lines should then hook up similar to how they were disconnected. It wasn't that easy for me. The metal collar for the strainer on one of the drain lines was cracked in half. I had to replace that section of pipe. While the metal piece of pipe had a threaded outlet for the dishwasher, my new PVC section only had a serrated edge, but it fit my dishwasher line luckily.
I did have to shorten the drain line to the other strainer. Make sure your connections are tight. Hand tight should be fine, but if you see any leaks, and if you do they should be slight, tighten the connections a bit more. If you still have leaks, you can apply silicone caulk to joints and allow it to dry a day before use.
Summary:
A brief synopsis with images:
|
| Clean, then attach forms. |
|
| Tape all joints, or better yet, caulk. |
|
| Pour concrete. Notice the leak at the back left because I didn't caulk. |
|
| Spot pour and sand away mistakes. |
 |
| Seal and seal and seal again. |
|
| Finally it's done, well after you wax it. |
Other Pictures:
Here are a bunch of leftover pictures of the process that didn't fit in the blog above, but might still be useful.
 |
| The forms after removal. |
 |
| So much sanding! Got rid of that orbital soon after. |


No comments:
Post a Comment