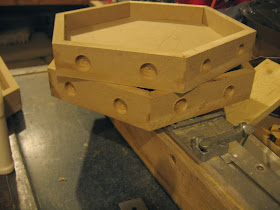
I've been wanting to build a diorama for years, but have always found more pressing projects. This project may be as much for me as anyone else.
I knew I wanted something big with lots of features, but at the same time it needs to be portable. That transitioned to a tiled diorama. I considered squares, but that did not provide enough customization. A hexagon was it. I decided magnets would be used to hold it together. I didn't want the tiles slipping apart.
 |
| This is where we will end today's post. |
Did I mention this is for a two year old? I'm not sure how well construction will hold up to the rigors of a two year old, but I will found out in a week!
The Materials:
-1/2" MDF
-2" pink polystyrene insulation (found at home improvement stores)
-foam core board (optional)
-cardboard (optional)
-hot glue
-Plasti-Dip
-plaster of paris (optional)
-paper towels (optional)
-acrylic paints
-water
-white Elmer's glue
-sawdust
-clear caulk
-3/4" ceramic magnets (12 per tile)
 |
| Pink polystyrene 2" insulation and 1/2" mdf. |
-pencil
-protractor
-ruler
-right angle
-circular saw
-clamps
-4' level
-3/4" Forstner drill bit
-sander
 |
| Tools of the trade. |
The Pattern:
A pattern was made with paper to form a 12" point to point hexagon. Mark you center and use a protractor to measure consecutive 60* angles. Make each line 12" long total. Once you connect the dots, you should have a hexagon with roughly 6" long sides.
The Base:
The pattern was transferred to the 1/2" MDF and five tiles were cut. I also kept the half panels created.
I then cut 1" stripes of 1/2" MDF. This will form the border of the tiles and create a common elevation point between neighboring tiles. You need to cut the ends of the 1" strips at 30*, as these are interior angles. I cut the strips on a table saw using the guide set to 30*.
 |
| The 1" strips before being glued down. |
I then took 3/4" magnets, drilled two equally spaced holes the depth of the magnet into each edge using a 3/4" Forstner drill bit. Make sure your holes are consistent for each tile. They will need to meet. When you glue the magnets, make sure they face the same way so they'll 'stick'. Test fit often. You won't regret it.
 |
| Two magnets on each face. |
 |
| A magnet in place. |
At this point I stained the wood, for a finished appearance. Before staining, I used a router to route the bottom edge at a 45* angle. This was a purely aesthetic choice.
 |
| I had planned to paint the wood frames, but liked the stained look. |
The Terrain:
Cut the insulation to fit the tiles. Hot glue was used to attach insulation to wood and insulation to insulation.
 |
| This is how all tiles started, then I added and subtracted to get the desired shapes. |
 |
| A muddy ditch and dino footprints. |
 |
| A cave. The wood engraver melted the foam to give a nice stony texture that a serrated blade could not achieve. |
The conclusion to this tutorial will be following soon.


No comments:
Post a Comment