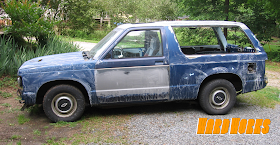
My vehicle needed a paint job. The clear coat was peeling, there were scratches, a couple of dents, and years of abuse.
 |
| This is when I first got my vehicle. The paint was rough even then. |
 |
| This is one of the first pictures. After six years, the clear coat on the hood was gone and the roof was starting to rust. |
I didn't want to spend three-thousand dollars at a body shop, and while there are places that will do it for a few hundred, the results are sloppy.
How do I get a good looking paint job without spending a small fortune?
If you are detail oriented and patient, you can do it yourself for one hundred dollars.
I bought 4 quarts of Rustoleum paint. Sail Blue and Charcoal Gray. If I painted the vehicle a single color I could have purchased only 3 quarts. With a small car, 2 quarts may do it. Rustoleum enamel is supposed to resist fading and sun damage. After one year, the paint still looks great.
Parts list:
-$50 for paint for 4 quarts. Most likely you'll only need 3 quarts.
-$20 for odorless mineral spirits
-$20 for primer
-$15 for 600 grit sandpaper and painter's tape
-$7 for a foam roller
Total was $112. I already had body filler, a bucket to mix the paint & mineral spirits, and sandpaper.
On to painting! But first, the preparation.
The bulk of this job is preparation. Lots of it.
Take off and unbolt anything and everything. This will allow for a cleaner job and prevent paint getting on parts it shouldn't. Also, if you sand the vehicle, you won't scratch any parts. Parts to remove include headlights, taillights, grille, side mirrors, bumpers, etc. You should leave doors, trucks, and hoods in place.
You need a system when you remove parts so that you have all the screws and bolts to reinstall. I taped the screws to the back of the part. Since the exterior parts are large, it's easy to remember where they go. If you have a lot of small parts, you may want to label them individually and/or bag them.
Next, clean the vehicle. Paint will not stick to grease and dirt. I used dish detergent. Any surface you plan to paint needs to be cleaned thoroughly. Clean behind all the parts you took off. Cleaning the years of grime you've never been able to reach before will prevent it from falling into the paint and give you a professional looking job.
Sand the vehicle. This will remove scratches and promote paint adhesion. I wet sanded the vehicle with 600 grit sandpaper. Make sure your sandpaper is made for wet sanding.
 |
| My roof had been repainted before and had a light coat of rust. I sanded the entire thing down to bare metal to knock out all traces of rust. I used a dual action pneumatic sander for this task. |
 |
| Everything that could be removed or unbolted, was. |
 |
| The rest of the car was sanded in preparation for paint. |
Wet sanding involves a bucket of water and sand paper. The water ensures your sand paper does not clog up.
 |
| I removed the rear windows, only because I was replacing them. It is not a step I would do just for the fun of it. |
 |
| As you can see, I removed everything. |
 |
| I replaced the driver's door as the bottom edge had rusted out. |
This is up to you, but I used body filler at a couple of pitted rust spots and dents. I removed all rust and cleaned these areas very well. This will add cost, and if you do not have experience with body work, it may only worsen the situation.
You want to apply the body filler over a larger area than your dent. I sand the dent with 40 grit paper to promote adhesion. The goal is to apply the body filler as smooth as possible. With a sanding block, sand the filler down. Once you think it's ready, spray it with primer, then lightly mist it with a contrasting color and sand it again just to remove the mist layer of paint. This will make any imperfections or low spots obvious. Spots that still have the contrasting color are low spots. Maybe sanding the entire area will level the low spot or you may have to add more filler.
Repeat as necessary until it is right.
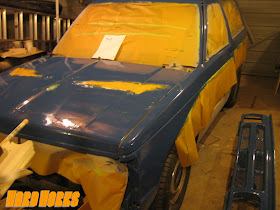
Tape off parts that don't need paint- glass, tires, etc.
I had paper, but newspaper works fine. I painted the whole thing with rattle can primer first. Since the roof was bare metal, it was necessary. Also, since there were body filler spots and varying degrees of color, I wanted a base that was an even color.
 |
| Primered and finally ready for color. |
Mix your color using thinner and paint. This allows for a smoother finish using thinner, but also makes it prone to runs. You will want to do multiple thin coats. I had read a 1:1 mix, but I preferred a 1.5:1 paint to thinner mix.
 |
| Rustoleum Sail Blue. |
I went with a two tone paint job. I like to make projects as complex as I can. You want to work from the top down to avoid drips on areas you've already painted.
I used a 4" roller. I also used a brush at door jambs and hard to reach areas. With thinning the paint, it is more likely to run, but the thinness helps you apply smooth coats. I found that going back over a panel currently being painted when the roller was dryer would help with the runs. You need to do six coats. This is plenty to last a long time and allow you to buff it if you choose.
I was able to apply two coats per night. You want the first coat to be tacky, but not wet to where it comes off when touched.
 |
| It's going to take about six coats to be thick enough and look good. This is coat number one. You can see how thin it is. |
Once you've painted the vehicle and any accessories, such as bumpers, grilles, side mirrors, bolts, screws, etc. It's time to bolt them back up. Don't forget to paint bolt heads that show. Be careful as you reassemble- you don't want to scratch your fresh paint.Painters tape on edges of bumpers and an extra pair of hands if available help insure you don't scratch your new paint.
The results are great. If I had buffed it or gotten someone to buff it, this would look like a three-thousand dollar job. I wasn't bothered by the roughness, so I didn't. There are a few runs (in part to painting it in a dimly lit basement), but it looks great from afar. For the first time since I've owned it, the paint is not in a state of disrepair.
This project took a little over a month as I worked on it as I had time. I had a garage for the vehicle which helped.
Actual painting took eight days. I was able to apply two coats per night, so three days for the blue, three for the gray, and the two days were spent finishing painting the accessories.
Assembly was done over a weekend. Wet sanding took one Saturday. Part removal was done over the course of a week. I could have had that done in a couple of days. The rear windows had to be cut out which took a few days. You won't have to take this step.
Sanding the roof to bare metal took two separate nights, and replacing the driver's door was another day.
It's best if you have a spare car to drive. A garage is convenient but not mandatory. If you have any questions let me know. The next time one of my vehicles needs paint, I will definitely do this again.


By using Tube Tape Vehicle laborer can do masking door jambs, soft paint edge, trunk masking and there are various other uses for Tube Tape.
ReplyDeleteAutomotive aperture tape yield a smooth finish without hard paint edges.
ReplyDeleteLarge Tube Tape, quick easy to mask your car door, hood gaps on trucks & older cars with large tube tape. Get professional innovative masking solutions.
ReplyDeleteAutomotive Masking Solution – mask your car door, hood, or trunk fast & easily by tube tape. Automotive aperture tape yield a smooth finish without hard paint edges.
ReplyDelete